Saturday, December 25, 2010

Bubbly Pear Cupcakes

Merry Christmas! My mother asked for cupcakes for our Christmas dinner, but she was specific about what kind of cupcakes to make: Guinness Chocolate Cupcakes with Bailey's Irish Cream Cheese Frosting. Since it is a duplicate recipe,  I wanted to make something new! I decided to make that plus a new recipe that I found here. I wanted to make this recipe for my birthday at work, but was specifically told that I am NOT allowed to make my own cupcakes for work by my co-workers. (I guess they have something planned for me!) I thought the recipe would be perfect since my birthday is the day before New Year's Eve and this recipe has champagne!


Beef Brisket - Guinness & Brown Sugar

This recipe has been used multiple times within the last month due to the holidays and the demand for this meat! Every time I make this, the meat comes out so tender a knife is not needed and the vegetables still have integrity. This is based on my previous post, Homemade Beef Brisket, with some changes. I thought I would post the new recipe, which I have been using so frequently.


Information:
Prep Time: 30 minutes
Total Time: 9 hours, 30 minutes
Makes: 4-6 servings

Ingredients:
1 beef brisket - 4-5 lbs
1 medium sweet onion
3/4 whole garlic
6-8 carrots
6-8 red skinned potatoes
12-16 mushrooms
2 cans of Campbell's Golden Mushroom soup
3 bay leaves
4-5 tbsp dried thyme
1 bottle Guinness beer
1 1/2 C brown sugar
5 dashes of Tabasco sauce
8-10 dashes of Worcestershire sauce
4-5 tbsp pepper
4-5 tbsp salt

Directions:
1. Wash all vegetables! Washing the inside of an onion will keep down the strong smell and eye stinging.
2. Chop vegetables. Onions: 3 inch pieces; garlic: peeled, whole - not minced; carrots: 2-3 inch pieces; potatoes: quartered, or smaller if you want; mushrooms: quartered
3. Put the Golden Mushroom soup in a large bowl.
4. Add the bay leaves, thyme, water,  Tabasco, Worcestershire, pepper, and salt to the soup and mix until incorporated.
5. Add the vegetables to the soup mix and mix until the vegetables are smothered in the soup.
6. Cut the brisket along the grain of the meat. Cut into 4 or 5 strips.
7. Put half of the vegetable mix into the crock pot.
8. Lay the brisket strips on the vegetables, leaving enough room on the sides and in between the beef to let moisture mingle.
9. Lay the rest of the vegetables on the top of the beef. Make sure every part of the beef is covered in vegetables.
10. Cook on low for 9-10 hours.
11. Serve when the meat is as pink as you like.


********** The changes from the original are not major changes, but they do make the brisket taste differently, a sweeter and richer flavor. These changes are: don't add the water, instead add the Guinness and brown sugar    .........      That's it. Remove one ingredient and add another? It sounds so simple, at yet the flavor is more complex and full - robust, almost. I've gotten more compliments on this recipe than some of my better cupcake recipes!!! I love this recipe and will continue to use it until I swap out more ingredients, in which case I will definitely keep you posted as to the new changes.

Wednesday, December 15, 2010

Chocolate Cupcakes with Chocolate Frosting

Another birthday at work, and as requested, I have made a chocolate cupcake with chocolate frosting. The search for the perfect chocolate cupcake continues. Every time I make a chocolate cupcake, the cupcake comes out bad or doesn't bake all the way. My husband thinks it has something to do with the type of baking chocolate I'm using (standard Albertson's brand). For all I know, he could be correct. I knew I had some Dutch cocoa powder on hand, so I found a Dutch cocoa powder recipe here, and decided to try it. The cupcakes rose just like normal cupcakes, they were a perfect looking cupcake. And then you eat it.... And your tastebuds get up and start DANCING!!! OH MY STARS this cupcake is moist and sweet and absolutely perfect! I have found my "go-to" chocolate cupcake recipe! From here I can add ingredients, flavors, and play with the look and taste of these cupcakes. I'm so excited for this recipe, and I'm really glad it's a simple recipe that uses all the same ingredients and nothing special. 

The frosting recipe is my "go-to" recipe. I didn't have any milk on hand, so I used 2/3 half and half. My husband said he could taste the difference, but it was slightly better - a richer, creamier texture. He loved it! 


Monday, December 06, 2010

Eggnog Cupcakes with Eggnog Cream Cheese Frosting


My husband just loves Eggnog and can't get enough of it come the holidays, so I decided to make a treat just for him (and the youth at my church). I Googled the recipe and found it here. The recipe came out great, though a little gooey in the frosting department, but otherwise great! Some of the youth at church were saying "Wow, this tastes just like Eggnog!" My response was "Then it came out perfect!"


Friday, December 03, 2010

Mini Vanilla Cupcakes - Christmas Style!


I was asked to make mini cupcakes for a church event and attempted to make vanilla and chocolate. (Again the chocolate did not turn out) but the vanilla came out great! The recipe is a duplicate, I admit, but it just tastes sooooo good, even I gobble these up! I don't normally eat cupcakes because they are too sweet for my taste, I prefer a fruit or a vegetable. Some people think it's weird I don't eat my own cupcakes, but the truth is: I don't eat anyone's cupcakes, store bought or not. It's just not my thing. But I love to bake and smell the goodies I bake!

The cupcake recipe is the same as the Confetti Cupckes. I didn't use the sprinkles, but instead added about an 1/8 of a cup of sugar to compensate, since sprinkles are basically sugar.
The frosting recipe is my go-to Vanilla Frosting. I used a lot of red (more than you'd think) food coloring, and quite a bit of green food coloring on two different batches of frosting. I just cut the frosting in half and colored one side, then the other. The red came out kinda swirly because it didn't sit right with the powdered sugar, but I think it looks cool! Like a poinsettia, perfect for Christmas!

Thursday, December 02, 2010

Gingerbread Cupcakes with Lemon Cream Cheese Frosting

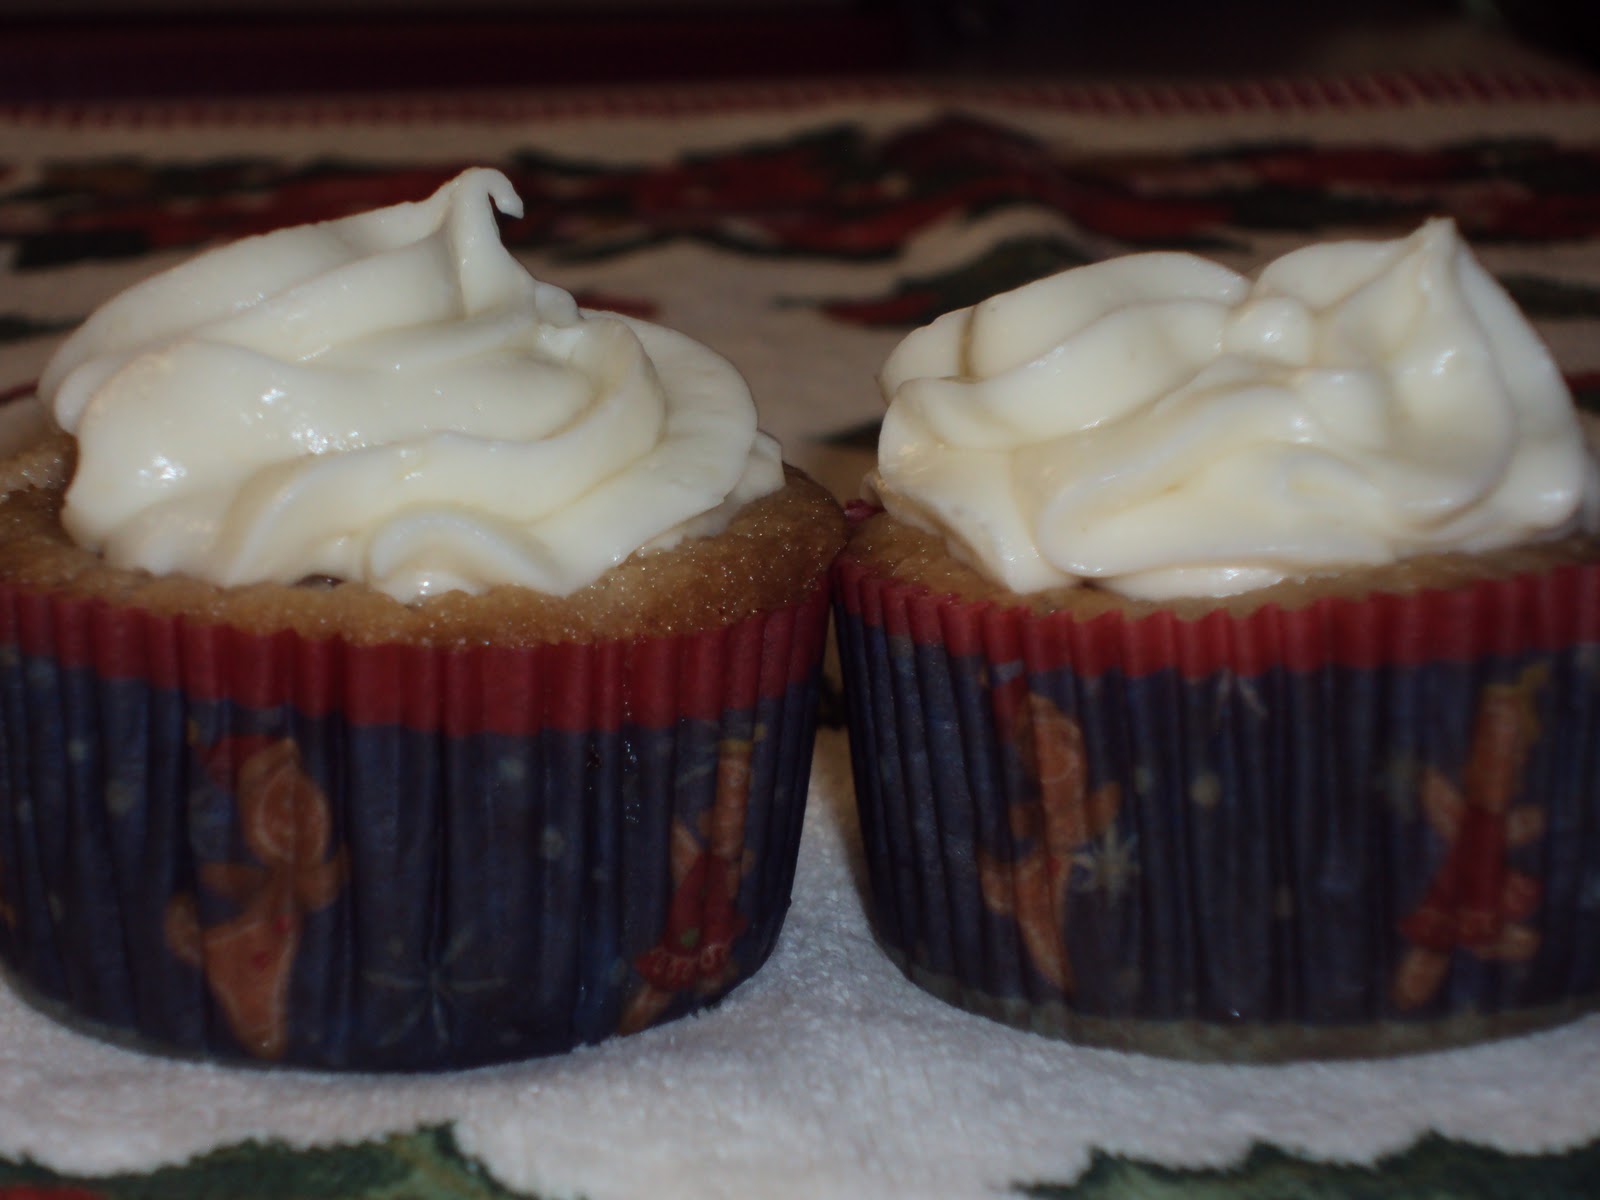
I love the holidays! More reasons to bake, and an introduction of spices that tend to be too "powerful" for spring and summer flavors: allspice, nutmeg, cinnamon, ginger, and ground cloves! I just love the aroma of fresh baked holiday goodies! This recipe comes from the need to make a dessert and bring it to a staff Christmas party at church. Since it's a Christmas party, I decided to go with a Christmas flavor: Gingerbread! I Googled, I Yahooed, and I SwagBucked my way through recipe after recipe that would produce the flavor and look for what I wanted. I found it at Epicurious, which is a site I've used a bit for recipes. My husband has only had bits of cupcakes from this recipe but couldn't get enough and cannot WAIT to try the whole cupcake on Friday. A few modifications: the recipe from Epicurious calls for candied ginger, but just as a topping, so I ditch that because it's kind of pricey around here... Also the recipe on Epicurious tends to jump around, so remember: this is the way I did it!! One more thing: read the directions all the way through before attempting. As contrary to almost all of the recipes on this site, the baking soda DOES NOT go into the flour mixture!!


Saturday, November 20, 2010

The Disappointment

Also known as: I can bake any cupcake you want…. 
Just don’t ask for a plain chocolate cupcake.

This blog’s entire purpose is for me to share my experience baking cupcake recipes. Whether I like the recipe or the outcome – or not. In this situation: OR NOT. And the blog needs to be honest – otherwise nobody will know if something is done wrong or not! This blog is not a search for appreciation. This blog is not a place for me to complain. This blog is a place for me to tell the truth about what happened, and maybe search for some answers if something isn’t quite right with a recipe.

The book I started this blog on was is Cupcakes! by Elinor Klivans which starts out with basic recipes that a lot of the recipes in the book are based on: yellow batter cupcakes and a sour cream based chocolate cupcake recipe. The yellow batter is really good, but recently I have been using the Confetti Cupcakes recipe because it just tastes so frickin’ good! I have yet to find the perfect Chocolate Cupcake recipe.

The most recent search for the “perfect frosting” turned out great! I have found that frosting and use it on everything because it’s pretty and tastes amazing!

My new search is for the “perfect chocolate cupcake recipe” and this search will continue until I can find it – there is no stopping. So…. Family, I’m sorry if you get really bad cupcakes for a while. Just know, I will find it, it is out there.

This weekend the youth at my church are doing a fundraiser. I should probably mention that I am the coordinator for the high school group, so I take a lot of pride in my youth, and I work very hard to make them happy. The fundraiser is to sell car decals: (a 4X6?) sticker to put on your car with the denominations name and a chalice. Along with this, the youth decided to make cupcakes and cookies to sell to the church (or anybody who wants them!). We decided we would make chocolate and vanilla cupcakes and a type of Chocolate Chip Cookie.
            Vanilla Cupcakes = Confetti Cupcakes
            Chocolate Cupcakes = Sour cream based chocolate cupcakes
            Cookies = Chicago Crunchy Chocolate Chip Cookies

Sounds easy? Sure!!!!                       No.

The confetti cupcakes went great – no problems.
The frostings (chocolate and vanilla) went great – no problems.
The cookies went great – no problems.
The chocolate cupcakes went PHHHFBT!!! – PROBLEMS!!

Something about this recipe frustrates me. The cupcakes do not bake all the way and always ALWAYS ALWAYS!!! deflates. I tried it again thinking it would work if someone else was using the recipe. (Plus, I paid for most of the ingredients, so none of the cupcakes would come out of the youth fund.) I feel awful that 50+ cupcakes had to be thrown away because they may not have been cooked all the way through, or there may have been something wrong with them. I don’t like wasting food. I don’t like watching the youth have a great time baking the cupcakes all for naught. It makes me wonder what on earth is going on with the recipe, where I go wrong, or if I’m using a wrong ingredient somewhere. The search goes on. If anybody could share some insight, that would be fantastic. The recipe is located here if you want to look it over and see what is so horribly wrong with this recipe? It comes from a book that has so many other great recipes, I just can’t believe that this recipe could fall apart.

EDIT!
I forgot the link the recipe, so I did that, but if you would rather just view it here....
Cupcakes:
Information:
Prep Time: 10 minutes
Total Time: 30-35 minutes
Makes: 18 regular cupcakes or
               12 big-top cupcakes or
               12 extra-large cupcakes or
               60 mini-cupcakes

Ingredients:
3 oz unsweetened chocolate, chopped
1 C unbleached all-purpose flour
1/2 tsp baking powder
1/2 tsp baking soda
1/4 tsp salt
1/2 C unsalted butter, at room temperature
1 1/4 C sugar
2 large eggs
1 tsp vanilla extract
1/2 C sour cream
1/2 C water

Directions: 
1. Put the chocolate in a double boiler, and stir until the chocolate is melted and smooth. Remove from the heat, and set it aside to let it cool
2. Mix the flour, baking powder, baking soda, and salt and set aside.
3. In a large electric mixing bowl, whip the butter and sugar until smooth and creamy, about 2 minutes. Stop the mixer and scrape the bowl if necessary.
4. On a low speed, mix the melted chocolate in the butter mixture.
5. On a medium speed, add the eggs, one at a time, until the batter is smooth.
6. Add the vanilla, mix about 1 minute.
7. Mix in the sour cream until completely blended, no white streaks.
8. On a low sweep, add half of the flour mixture.
9. Mix in the water.
10. Mix in the remaining flour mixture until completely smooth.

The batter is ready to be baked now, or add fruit, nuts, chocolate chips, etc. To bake, put batter in cupcake liners 2/3 to 3/4 full and bake at 350°F for 20-25 minutes. After 20 minutes, check the cupcakes. A toothpick inserted should come out clean, or with dry crumbs.

Saturday, November 13, 2010

Guinness Chocolate Cupcakes

This is a repeated recipe upon request. But I felt like posting photos because I  took photos of the cupcakes in these adorable wrappers!


Sunday, November 07, 2010

Pumpkin Ginger Cupcakes

As the seasons turn from early fall to full on autumn, pumpkins and spices become the favorite flavors. Another birthday at work, so I asked my co-worker what flavor she would like. Her first answer was "something with pumpkin". I thought to myself, "that's easy enough, especially since I had a recipe I had been waiting to try. After reading the recipe, my only fear was that I didn't know where to find Crystallized Ginger. After talking with my mother, she mentioned an Asain market or a health food store, as ginger is commonly used in Asain foods, or as a tool to help an ailing stomach. I did find the ginger needed for the recipe, after a little searching in the candy aisle of a 99 Ranch Market. The recipe comes from the book Cupcakes! by Elinor Klivans.


Tuesday, October 26, 2010

Confetti Cupcakes

When asked what kind of cupcakes she wanted for her birthday, a co-worker said "Fun-Fetti Cupcakes", which as most beginner bakers know, is a popular Betty Crocker boxed cake mix. Well, I no longer bake from boxed cakes, everything I make is homemade, so I had to come up with a recipe that looked and tasted like the Betty Crocker cakes that everybody knows and loves. I searched and searched, and finally came to this one. It is a thin batter, but bakes fluffy and tastes like a massive sugar cookie! You'll never guess where I found the frosting recipe!! I was shopping for ingredients to the most recent buttercream recipe I had found from Wilton. While looking at the different powdered sugars the local Albertsons has to offer, I happened across a frosting recipe on the back of a C&H powdered sugar! I snapped a quick photo of the back of the box on my iPhone as the box was 20 or 30 cents higher than the store brand. As we are pinching pennies, we need to buy the least expensive items as possible until I can afford the finest our world has to offer. In the mean time, after using this frosting recipe, I doubt I will stray. This recipe is rich, thick, and not too sweet, not too buttery - absolutely perfect.

I only have the one photo, but I know I will re-use this cupcake recipe again and again, so I will post more photos when I go. I'm keeping this recipe up for anyone who wishes to use it. I no longer use this recipe, but it is a great recipe, so try it!

Cupcakes
Information:
Prep Time: 10 minutes
Total Time: 30 minutes
Makes: 12 cupcakes

Ingredients:
1/2 C milk
3 egg whites
1 tsp vanilla extract
1/4 tsp almond extract
6 tbsp butter, room temperature
1 1/4 C unbleached flour
1 C sugar
1/2 tsp salt
2 tsp baking powder
2 tbsp rainbow sprinkles

Directions:
1. Preheat the oven to 350°.
2. Whisk the milk, egg whites, vanilla extract, and almond extract in a small bowl and set aside.
3. Beat the butter with the flour, sugar, salt, and baking powder until the mixture is like a thick sand.
4. On a medium speed, add the milk mixture, and mix until smooth, stop the mixer and scrape the sides of the bowl if necessary.
5. Add the rainbow sprinkles and mix until combined.
6. Line a muffin tin with cupcake liners.
7. Fill the cupcake liners to about 1/3 inch from the top.
8. Bake for 20-22 minutes, until the edges are slightly brown and an inserted toothpick comes out clean.
9. Let the cupcakes cool completely before frosting.


Saturday, October 23, 2010

Applesauce Chocolate Cupcakes

Since its APPLE SEASON!!! (Yay!!) I am doing as many apple-based recipes I can get my hands on. Tomorrow is my manager's birthday, and so I asked her what she wanted. She didn't really have a preference, so I asked if I could make Applesauce Chocolate Cupcakes. She said she'd love it, especially since she knew I recently went apple picking! The recipe was a lot of fun, and I got to make some applesauce! This recipe inclues the previous recipe for applesauce, found here.


Thursday, October 14, 2010

Homemade Applesauce

This recipe creates a slightly chunkier applesauce, but is very tasty warm or cold!

Information:
Prep Time: 15 minutes
Total Time: 35 minutes
Makes: 3 C

Ingredients:
8 medium apples*
1 1/2 C water
1 1/2 C sugar
(optional) 1 1/2 tsp cinnamon
*I used three larger Granny Smith and four smaller Rome Beauties

Directions:
1. Core, peel, slice, and chop the apples. I used a food processor to chop the apples.
2. Place apples and water in a pot and bring to a slow boil.
3. Add the sugar and cinnamon.
4. Simmer on low for 20 minutes.
5. Strain any remaining water.

Saturday, October 09, 2010

Homemade Baked Apples

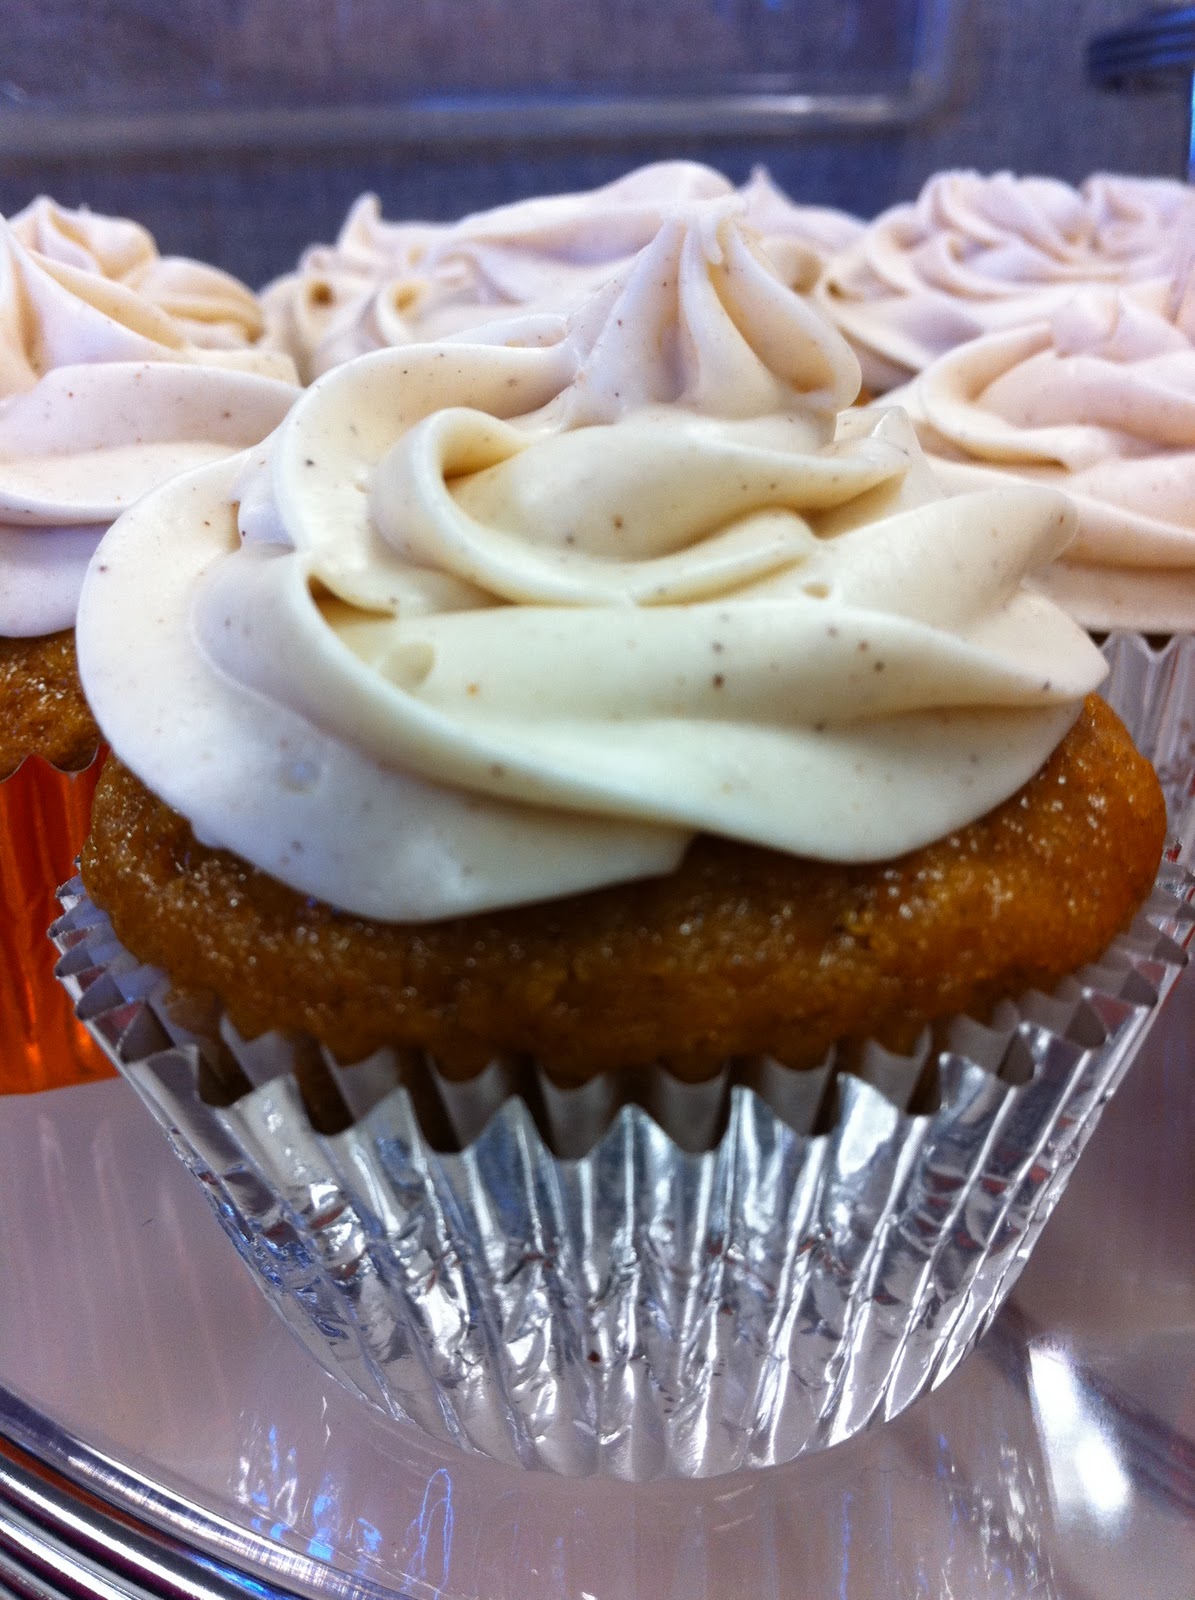
I've never had this before, but I've seen a lot of different recipes for baked apples, so I must assume its an East Coast thing? Feel free to correct me if I'm wrong! Since I have plenty of apples, I decided to try this recipe out! I haven't tried one yet (the pie is just too good to stop eating), but according to my brother-in-law, he likes the recipe!

Information:
Prep Time: 0 minutes
Total Time: 35 minutes
Makes: 9 small apples or 6 large apples

Ingredients:
9 small apples or 6 large apples*
3/4 C brown sugar
1/4 tsp allspice
1/2 tsp cinnamon
1/4 C water


Directions:
1. Preheat the oven to 350°.
2. Core the apples - do not peel or slice them.
3. Peel a 1 inch thick strip around the middle of the apple.
4. In a small or medium bowl, mix the brown sugar, allspice, and cinnamon.
5. Pack the cored apple with the brown sugar mixture, as hard-packed as you can get it.
6. Place the packed apples into a deep dish baker, and pour a little bit of water in the bottom of the pan to just cover the bottom of the pan.
7. Bake for 30 minutes, basting the apples in juices frequently.
8. Serve warm with sweetened whipped cream.
9. Store in a closed container in the fridge and microwave for a midnight treat!

Homemade Apple Pie

Since last week was the trip to Oak Glen, CA, I knew this week would be based around APPLES!!!! I borrowed an awesome book from my mother called The Apple Lovers Cook Book. On my trip, I found the exact same book and bought it to add to my own collection, also so I could give back my mother's cook book. One whiff of this cook book and you can tell it has been sitting in an apple gift shop for a while. This book has more recipes containing apples, apple juice, and apple sauce than I will ever need. But with one or two read-throughs, I found several recipes I will definitely use, and I have already dog-eared some pages. I started out with an American favorite (which is strange because the origins aren't in the US, but instead a Dutch recipe): apple pie. I could have bought a pre-made pie crust from the store, but that's a no-no! Since I'm a beginner with pie crusts, I had my husband help me make the pies. He says "I know how to bake, I just don't like to bake." And yet, he had fun and enjoyed the outcome! The recipe is actually extremely easy, but the pie crust was a pain in the butt. Plus, slicing, peeling, and coring all the apples was a timely process. But, overall? Success, and absolutely amazing!

Pie:
Prep Time: 20 minutes
Total Time: 1 hour, 15 minutes
Makes: 1 9" apple pie

Crust:
Information:
Prep Time: 0 minutes
Total Time: 5 minutes
Makes: 2 9" pie crusts

Ingredients:
2 C sifted unbleached flour
1 tsp salt
3/4 C shortening
4-6 tbsp cold water
1/4 C extra flour

Directions:
1. Lay out wax paper and sprinkle with a generous amount of flour.
2. In a small to medium mixing bowl, cut the flour, salt and shortening together using your hands.
3. When the dough is crumbly and pea sized, sprinkle some water on the dough and form into a ball.
4. Cut the dough into two parts.
5. Using your hands, flatten out the smaller ball of dough on wax paper. 
6. Using a floured rolling pin, roll out the dough into as good of a circle as you can, 1/4 inch thick.
7. However you can maneuver, put the crust into the pie pan. (I flipped the crust over the pan and then slowly peeled the wax paper off the pan.)
8. If you need to fix any cracks in the pie crust, use dry, floured fingers to press the crack together.
9. Once the pie is filled, repeat steps 5 and 6 for the second small ball of dough.
10. Cut the dough into strips and set aside (or leave alone, if you have the space) for later use.


Filling:
Information:
Prep Time: 0 minutes
Total Time: 15 minutes
Makes: Enough for one pie

Ingredients:
6-8 medium sized apples*
1 1/2 C sugar
1/2 tsp cinnamon
4 tbsp butter
* I used Granny Smith apples for one pie, and Macintosh for another


Directions:
1. Preheat the oven to 400°.
2. Peel, core, and slice all of the apples being used for one pie. (I used a Pampered Chef Peeler/Corer/Slicer.)
3. Mix the slices with the sugar and cinnamon until completely coated.
4. Fill the pie and evenly space out the top of the pie to be as level as possible.
5. Dot the top of the apple filling with butter.
6. Lay the strips of crust across the apple filling.
7. Bake for 50-55 minutes or until the crust is a golden brown.
8. Serve warm with vanilla or cinnamon ice cream!

Saturday, October 02, 2010

The First Annual U-Pick!


 As it is autumn in Southern California, I am rather excited for all of the flavors fall brings: spices, pumpkin, apples, and squash. In Southern California, there is a well-known town that many go to visit to pick their own apples or enjoy a day surrounded by gorgeous scenery. My sister, niece, close friend and I did both!


In Oak Glen, California, there are many places that offer a U-Pick style: buying a certain size container and pick apples to fill said container. We went to Los Rios Rancho. We went all in and bought a 1/2 bushel (a decent sized box, as shown on my niece's head!) and picked Rome Beauties and Granny Smiths! I purchased a ten pound bag of Macintosh from the store.


After apple picking, we took a tour of the farm in a horse-drawn carriage.


After that we got some lunch at a small, family owned restaurant called Law's. They are well known for their apple pie, with good reason!

After lunch, we hit the seasonal boutique set up for Halloween and fall with a lot of cute decorations! 


For some reason, I couldn't get the color right...
It's that color, but muted. It's really rather pretty!


One seller at the boutique was selling antique items, and I found this great train case! I bought it and it currently resides on my makeup station to hold my makeup and hair care products. 


All in all, it was an awesome day, and I foresee some apple recipes coming in the near future!